Parallel deployment tools

If you are dealing with deployments on regular basis then choosing a good and stable deployment library which has certain features for deployment e.g. parallel deployments is mandatory.

We recently faced same challenges as previously we were using Ant for packaging and deployment, then moved to Gradle but after considering moving our infrastructure behind load balancers (to support more users and fault tolerance) we wanted to have tool which can enable us to be able to deploy to our servers in parallel behind load balancer.

For this purpose we explored and tried out a few tools to see which tool would fit better for a longer run in our scenario. List of the tools which we evaluated are following:

1. Ansible: While it does support parallel deployment, it is quite a large tool set and more of a server management and configuration tool. We are already using Chef for server management and configuration so going with this was not ideal for us.

We preferred Chef over Ansible due to the utility and customizations we can do via cookbooks and recipes.

2. Capistrano: This tool is based on Ruby and follows deployment to a custom folder which is customizable but expects every deployment to be working from a separate folder via symbolic link.

3. Fabric: This is a python based library which streamlines system administration and supports for parallel deployments across fleet of servers.

In the end we decided to go with Fabric due to the following reasons:

  • Python is a more mature and widely used system administration language.
  • A vibrant community and documentation.
  • We are already using Python for some our tasks and plan to migrate other scripts (which are written in shell and php) to Python in the longer run.

Migrating domains from Godaddy to Route53

Godaddy is one of the oldest and widely used domain services provider but after after having Route53 from AWS (Amazon Web Services) it is almost necessary (as per a developer and automation perspective) to move to Route53 or any other DNS provider which provides us APIs and other services to automate around the domains. Due to this requirements, I had to move a few domains to Route53 from GoDaddy.

Migrating domains from one DNS provider to another is a big decision and requires careful planning to avoid any down time. When we were doing this we planned this adequately and followed these steps which I believe can be helpful for others as well.

Steps:

  1. Reduce TTL for every record to a few minutes so when we are moving they start sending traffic to Route53 immediately. This is not a required step but recommended if you want to test it quickly. If your current TTL time is in days or weeks then this will take that much time to go live.
  2. Export zone file from GoDaddy.
  3. Import zone file into Route53.
  4. Announce downtime for maintenance on scheduled date to your customers.
  5. Initiate transfer from Route53. Refer to #2 in references.
  6. Accept and authorize it from GoDaddy. Refer to #3 in references.
  7. Verify the changes.

Verification:

  1. After completing migration, we will need to run the following for each record from zone file to make sure it is responding to DNS query both with name server and without it:
  2. dig +noauthority +noquestion +nostats myDomain.com
  3. dig +noauthority +noquestion +nostats myDomain.com @ns-AWS-DNS.
  4. nslookup -debug myDomain.com
  5. nslookup -debug myDomain.com ns-AWS-DNS.
  6. traceroute myDomain.com

References:

  1. http://docs.aws.amazon.com/Route53/latest/DeveloperGuide/MigratingDNS.html 
  2. http://docs.aws.amazon.com/Route53/latest/DeveloperGuide/domain-transfer-to-route-53.html?console_help=true
  3. https://pk.godaddy.com/help/transferring-domain-names-to-another-registrar-3560

Creating local apt repo from DVD ISOs on Debian

openlogo-100Recently I installed Debian 8.4.0 on my system. I installed it from DVD ISO downloaded from Debian’s site. After installation of basic system, I needed a faster way to install new packages and for that I setup local repo from the downloaded ISOs.

To do so, I followed the following steps:

1. Create mount points at your required locations e.g. /media/username/CD1, /media/username/CD2 etc.

2. Update /etc/fstab with entries for mounting ISO image every time on reboot:
/home/username/Debian/debian-8.4.0-amd64-DVD-1.iso /media/username/CD1/ iso9660 loop,ro,user,noauto 0

3. After saving changes, run mount -a as root to make sure your changes are done correctly in /etc/fstab. Once this is confirmed, you can now mount this point by running mount /media/username/CD1 as root.

4. Now Update /etc/apt/sources.list with the following:
deb file:///media/username/CD1/ jessie main contrib

Make sure you comment out any other line pointing to CD ROM mounting of same ISO image present in sources.list. Once this is done run apt-get update

This should now first contact your local repo and then go ahead to other repos you have listed in sources.list.

Resetting Pattern / Passcode on Android Phone

I have been using Android based smart phone from 2+ years. I use it for different activities both on personal and professional levels. It has now become a part of my life and has made my life very easy and fast in one way or another. Yes. There are some negative points as well but I am fortunate to have more positives for having a smart phone.

Now I will cut this intro short and get to purpose of this entry. Recently I went to a service center of my telephony services provider as as I had some issues with internet from the day I had switched from post paid to pre-paid connection. While they fixed the internet issue on my phone, stupidly they applied a security pattern on my phone and unfortunately in the service center I didn’t check this. When I reached office and got a call on my phone I noticed this.

After noticing this, certainly I was very irritated and didn’t know what to do. I searched on internet and found quite a few solutions. Mostly they were trying to tell the users to reset their phone via resetting the phone to factory setting by going into boot menu of Android with some specific commands. I certainly didn’t like that idea and was looking forward for something more.

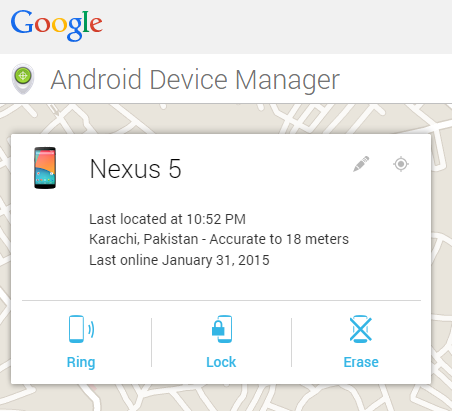
Then I realized that, I had added my phone to Google Device Manager (I would highly recommend that every Android device should be connected to this by their users) so I went there and saw this on my screen:

Google Device Manager

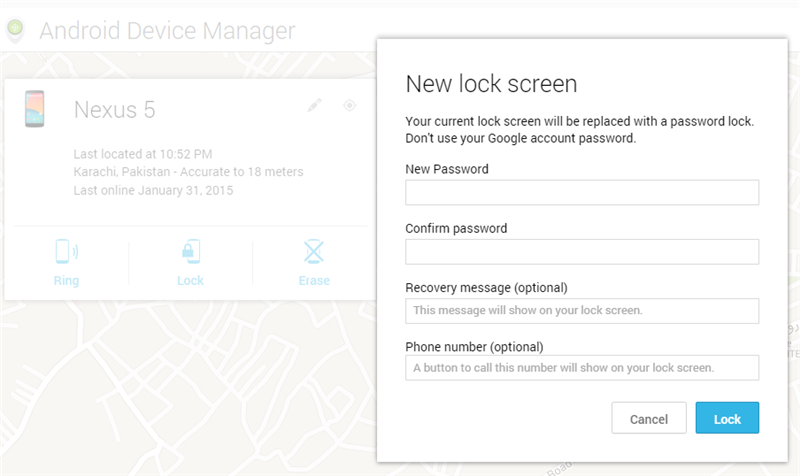
I realized this is something I was looking for. Clicking on the Lock screen, it showed me the below screen using which I set a temporary pass-code on my cell phone.

Google Device Manager - Lock

Doing this saved me from wasting time on resetting / cleaning all my data via Android special command or procedures. I know for geeks that would be worth trying but for someone who is only interested in restoring his phone, this will be the fastest way.

Also, using device manager if I ever want to reset my phone to Factory Settings I can do this via the Erase button on single click or by going to Settings -> Backup and reset -> Factory data reset. I don’t need to boot into Android boot menu via any special commands.

I have found this to very easy to follow and apply so I thought to share it on this blog to save time for others.

PivotalSigns – Startup Story

This is an entry I have been aiming to write from the day first when I started with my start up.

Why?

I had been working in a well reputed software firm in a very good position from 2005 without any major issues. Everything was cool and I enjoyed being there. I loved what I had been doing. However things started changing for me from 2011 end, when for the first time I felt I was not a good fit. I tried to switch my job responsibilities with in same organization but that didn’t help that much in the long run but still managed to spend some more time there. It was in April 2014 when this decision of parting ways after 8+ years was taken.

It was certainly not an easy one. Both on professional and personal level but sometime one has to step up and do something.

PivotalSigns is born!

pivotalsigns_logo_white

After leaving, I had two options: Look for a job, which would offer job security, a continuous stream of income and such but I may face the same situation as I had in previous organization after sometime.

I discussed with my friends who are already doing their businesses (most of my friends are doing their own business :)). They encouraged me to try on my own before heading for job hunting. I will especially mention Aamir Ansari of Think Enabled, Fawad Moon of DevEnhanced, Khurram Zafar and Shah Khalid apart from many others who helped me in taking and finalizing this decision.

I acknowledge it was not an easy decision but it was something like now or never. So in May 2014 PivotalSigns was launched.

From the beginning when PivotalSigns was launched, we had decided that it will not be a merely outsourcing company, instead we will look forward for partnerships that last.

We are working on our own product ideas and working with clients to bring life to their ideas. Our core values are to provide quality services, work hard and remain honest with clients and customers throughout the project / product life style.

Going forward, I will try to share my experiences and learning on this journey.

AWS Volume Snapshot Automation

I am working on a small backup automation script for AWS (Amazon Web Services). Previously, I wrote this script shared on Github Gist here to take a snapshot of a specific volume for one user which is already being used in production.

Now I am thinking to add the following to this script:

  • Add support in script to be used by multiple AWS accounts in different regions.
  • Remove older snapshots and keep only the latest 3 copies for so.

I will share this script as a separate project on Github once complete.